Gaming @ Home

My custom mame control panel design and any arcade / game related info.

Sunday, April 30, 2006

Ultimarc IPAC 4


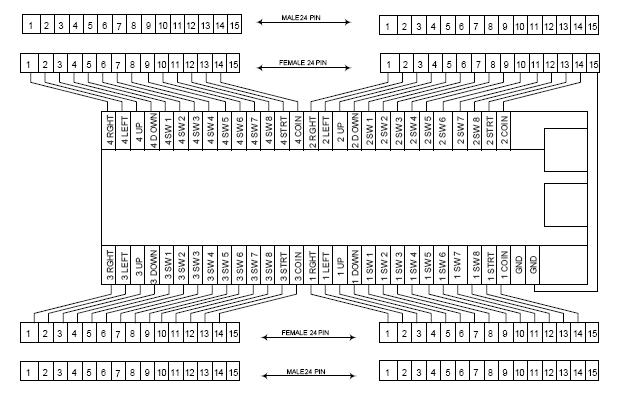
Here is the wiring that I used for the Ultimarc IPAC4 interface. As you can see, pins 1-14 were wired the same for all 4 connectors. Pin 15 was always ground. The connectors I used were actually 24 pin, so I had some extra unused pins. This was the key to my design. As long as all the connectors are wired the same on the IPAC side and the Control Panel side, I can plug any control panel into any connector and all the controls will work properly for that player. For each control panel, I used a 1 player button and a green coin button, rather then using 1,2,3,4 player buttons. See previous control panel pictures. That was so there wouldn't be any confusion about how the control panels could be plugged in. You just have to make sure you label the IPAC box properly.

Monday, April 24, 2006

MameRoom.com

You probably noticed that my parts list did not contain any wood? Well, as I stated before, I live in an apartment and not only do I not have room for a full arcade cabinet, but I don't have room to cut wood and everything else involved with building the actual control boxes.
I used an old plastic floppy disk case (see previous post for picture) to house the Ultimarc IPAC4 circuit board. Used my dremel to cut the holes for the connectors and for the USB connections.

For the control panel boxes themselves, I used MameRoom.com, they are great. I used their Control Panel Kit Designer to design and layout the boxes. Sent them the files that the program created and presto. A week or so later, I have 2 control panel boxes to put together. If you want to read a review of the service from MameRoom, check this link out at RetroBlast.com

2 things to keep in mind while designing your control panels. There should be a disclaimer in the software about the wood thickness. I specified 1/2 inch wood, but they can't use 1/2 because of the cam and post mechanisms. They increased the thickness but didn't take into account the rest of the measurements so things were kinda tight. It still worked but not as nicely as I would have liked. Also, the cam holes were not as tight as I would have liked. I could remove them freely from the holes. I used some gorilla glue to build a mold around the cams in the hole so it made a nice fit.

Saturday, April 22, 2006

Parts list

Here is a list of parts used for the arcade control panel.

Player 1 Controller
Ultimarc I-Pac4 Interface
Ultimarc T-Stik Plus
Groovy Gamegear Top Fire 4/8 way joystick
1 Player Start Button from SlikStik.com
Green Coin Button from SlikStik.com
SlikStik Spinner
Happ TrackBall 3"
7 button cluster. Variety of colors from SlikStik.com

Player 2 Controller
T-Stik Plus
Happ Universal
1 Player Start Button from SlikStik.com
Green Coin Button from SlikStik.com
7 button cluster. Variety of colors from SlikStik.com

1 - Belkin USB hub
4 connectors with minimum 15 pins. I used some from work.
quick connects from Radio Shack or anywhere.
20 gauge solid wire for wiring inside the control panel.
20 gauge stranded wire for extensions. More flexible than solid wire.

Tuesday, April 18, 2006

Mame News

Sorry for the long delay in updating. I got a news feed working using Feed2JS that reports news from MameWorld.net. Make sure you use it to stay up to date on the all the latest ROMS and Mame news.